Monday, March 30, 2009

MOVIE


To make the cool tubular cones on each side of the ticket booth i made a cylinder and varied the size of the top and bottom circles. To make the polygon that i used for the ticket booth i just cut out corners of a square. And to color everything i used the paint bucket. In case you didn't know its the tool that looks like a paint bucket.

To make this bridge I mainly used the circle tool, the rectangle tool, the pencil, and the push/pull tool. To make the supports I used the arc tool and made and arc from the top of each beam.

La Castle of DOOM~!


Alright! These are shots for the still incomplete Castle o' Doom, which is a very confusing work ways of internal pathways hidden in the depths of Madrid, Spain.
Actually, I have no clue.
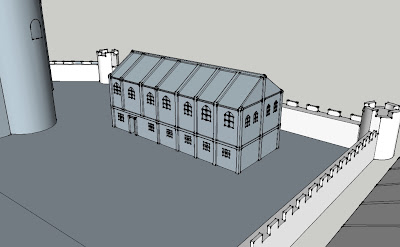
Anyways! I created this very easily, even though it took me a while. I mostly used the square tool to construct the structure of the building. One part was a half-circle, and I used the 'Follow Me' tool to make it another room. I coloured it, and then I proceeded to make everything mostly black, accept for the occasional red patch in which you all should know of as to what it is. Ahem. Anywho, I then went into the walls somehow and thought, "Aha! I will make a path in the walls!" So I did, using the eraser tool to erase every blocking object that there was, and then (for the most part) I coloured that, too. Adn viola! One very interesting maze-type-thing located in Madrid, Spain! ^_^

Temple


I made this temple thing by making a box and then using the push pull tool. for the top i made a cylinders and put half a sphere on it and erased sections of the cylinders. I imported the people and the wine bottle and the banana. i made the oranges out of spheres and cylinder's. The columns in the sides i made by indenting and then putting cylinders inside them.


This is a picture of The Elms mansion in Newport, RI. I started making this with just a rectangle, and used the push pull tool. From there I added a semi-circle to the front of the rectangle. Then I made all of the windows using a rectangle and the move copy tool. The most difficult part of making the windows was trying to put them on the semi-circle because it is not possible to put/draw objects on a cylinder. So I had to improvise by selecting the top view I drew a line from one end of the circle to the other and selected the push/pull tool and pushed that piece down to the ground, creating a semi-hexagon. Now that I had a flat surface I was able to put windows and a door on the surface. Next, what I made was the deck surrounding the building. All I did was again was made a rectangle and used the push/pull to add different levels. The two final things that I did was created a wall around the building. I created the wall by using the circle tool and I made two circles and used the pull tool to give it a wall affect. To make a finishing touch on this picture I added words.

Blue House


So this house took forever. I started with two rectangles and used the push/pull tool from there. Something interesting I learned was you can actually use the push/pull tool to make the different roofs connect. When doing this project the most difficult part I had was making the deck. I seriously spent the last week just working on the deck..I almost just gave up. At one point I was going to settle with just a ramp. The trouble first started when I was making the railing to the stairs in the second image. When I first tried to connect each rail on the stairs I could not make the rails connect evenly. Mr. Champney and I realized this two class periods later that I needed to make all of my stairs even. (So I basically had to start my stairs all over.) I then had to use the move tool and angle the top of every rail on the stairs evenly. (This allowed me to get actually create a downward slope.) I made the railing by using the pencil tool and connecting the tops of each rail. After I connected each rail a square was made. I next used the push/pull tool to create actual thickness of the railing. When doing this I came accross another problem, now that I had all of the rails angled and the railing made the rails and the railing didn't connect. To solve this problem I used the move tool to connect them. After I did this I made another staircase. (in the last photo to the left) Since I had all of that trouble with the last railing I just copied my staircase from the front of my house and pasted to the back. This actually worked out for the most part but I didn't realize that I could do this until I spent yet another class period on tring to make the railing connect. I don't know why but I made another deck. When creating this deck I again had similar problems to what I did previously. After dealing with all of these decks and staircases I put numerous windows and doors in. When making these objects I used the push/pull tool to create depth in each. The next thing I made was an upper deck and a garden. To put flowers in this garden I used an image from the 3D warehouse, copied it, and used the scale tool to make them look approprate in proportion to the house.

Friday, March 27, 2009


I created this ferris wheel by starting with the middle axis and pulling it across to make a cylinder. I then made a circle with a larger circle around it, filling the color with a translucent. Then I made the spokes going across the circle on both sides. The base I made with just a square then made the triangle by just connecting lines to the center. The carts was probably the hardest part. I made the basic cart and then copied it and placed it through the wheels. This was hard to do but I finally got the hang of it and it went pretty smoothly from there.

Colorful Space Station

This is my latest project. I'm making a space station for Mr. Murphy's game. The red thing is the engine. I made the two reflecting sides by using the scale tool to mirror it. Thin I had to screw around with the move tool to get it in place. I used the follow me tool a lot to make the donuts and the cones. That transparent sphere at the front is eventually going to be a bio-dome with futuristic buildings and water falls etc. I don't really know how big it will be, I'll scale it to Mr. Murphy's needs.

My Jail House


The hardest part of this house was the basketball hoop i had to make a block on the ground and raise it up, then make more squares on the sides and expand them out. to make to rim i used the arc tool. then i pulled it down and painted it to make it look more like a net. I tried to make a fence around the house to make it look like this person was rich, but in the end it just made it look like a jail. Thanks Mr. Champney.
So these are my steps in making a spiral staircase. I started with a circle divided up with another circle that i pulled up in the middle. The hardest part was figuring out how to make the other level. But i figured out that I just had to bring the post down in the middle and put another circle on that and then start the whole process over. It became easier as I went on because you just have to repeat everything every time you start a new level. I deleted the blocks of the different sections that I pulled up to make it look more like a spiral staircase. It's a pretty simple project so people could make them to put into houses they have made!


Chelsey Walks Colored


This is my animation that I posted before, but I added colors, a background, and some extra background animations.
The moving steam was really quite fun to make. All I did was draw the beginning shape of the steam, insert a whole bunch of frames, create the way I wanted the steam to end up then use the "Shape Tween" tool. What this does is gradually molds one shape into another over a series of frames. I used the same tactic for the clock that blinks red. I made it a darker red in the first frame then shape tween'd it to a brighter red. (The steam, the clock, and Chelsey are all "Symbols"--animations within an overall animation--so they continue to loop while the overall animation runs).

Anyway, this is my last day with flash for now. It was the best program I've worked with, and I definitely want to buy it. I highly recommend trying out the free trial.

--Martin

Balls }{][)(


This is a small project I was working on. The only difficult part is making a sphere correctly. Its a short and easy process. Just ask me and Ill explaine it to you. This is an unfinished project but I dont know where to go with it.


For this building I was trying to replicate some modern architecture because I like the angles that are created that are unique The second floor deck was my favorite part because it makes a L shape creating depth. It was really simple but in order to make some of the lines and angles it was challenging. Creating the little pool of water next to the house was hard as well making it look like it was going into the ground, so I had to slope the grass using the move copy tool but it kept taking other piece of my house with it.
I did download one plant to put in the (what is supposed to be) plant boxes. I will put in a lot more vegetation but it is really slow on these computers. It ended up looking more like a condo but im going to work on it more.

Thursday, March 26, 2009

Original Doll house Picture


This is an image of a doll house that I have been working on. The original picture is at the top and the various views of the replication follow. I changed parts of the house, such as the location of the door and the shape of the roof(little part of the house) just because of preference. I just used the picture as an example for what I wanted to do. I also added a pool and a hot tub in the backyard. The hardest part about this was making sure that the pieces of the house were not connected so that I could raise the roof and move it around how I wanted. I had to move the front piece of the house after it was all done and then connect it in order for the roof to work. The fence and balcony around the house took the longest time. I had to draw a rectangle all the way around on all sides and then take out the posts individually by drawing a line with a pencil and using the push tool to just push the post out until it disappeared. I tried other ways to build fences such as pulling the posts up individually and then trying to put a railing on, but so far this was easiest even though it was time consuming. I also had to make sure that I drew a line all the way across for the railing before I made the posts so that I did not have to try and put a railing on top after. I copy and pasted most of the windows to make them the same size, as well as the shutters but had to draw in the window panes individually. I also added tress and a sunflower to the yard by using google warehouse. To insert it into your 3-D drawing you go to File, 3-D warehouse, get models and you search for whatever you need or want to add to your house. The only problem is that your house has to be proportional to the images you get offline which is hard to do.


This is the most recent picture of my work in progress. For the most part all i have added are extra buildings and wells for the city. I kind of cheated on the slums a little bit that are on both sides of the city. I buil one side with the 12 houses and then just copied and pasted it on the other side.

Tuesday, March 24, 2009

Lincoln Memorial and Washington Monument


Here I made the Washington monument and the Lincoln memorial. I started this by making the ground with a big square in order ro see which axis would be the ground. I then added a square and raises it using the push/pull tool in order to make the start of the monument. I then used the pencil tool to make a "X" at the top of the square and used the move tool in order for the building to come to a point. For the Lincoln Memorial I started out by making a base with the square tool. I then raised it up and used the pencil tool in order to cut the base and used the push/pull tool in order to make stairs and used the circle tool to make the pillars.

Monday, March 23, 2009

car


i made a car using rectangles and the move tool

Unfinished Castle


This castle has taken me 2 weeks so far and im not done yet. I created the auctual castle by starting off with the circular parts then conecting them with a wall. I then pushed and pulled the different parts such as windows, doors, and even a ladder. The castle and the castle wall took me 3 classes to create.


The baracks to the right of the castle was created in the same way. But to make the baracks more realastic i added in wooden support beams which i again pushed and pulled to make it more convincingly realistic.


This is a house a simple house that I got inspiration from a picture online. The house ended up looking nothing like the one I started with though. I made the arched deck over the garage by pulling the rectangles out and then making the posts the same way and adding the arch with the arch tool. I added the pool in the back yard by making a square and pushing the middle in. I created the different layers of the pool by sectioning off parts with just a pencil line, and moving the height, this created the look of a shallow and deep end. I added the diving board to the pool but making a square and then pulling the diving board section out and then I gave the base a slight curve down. I made the deck with a rectangle on the side of the house and pulling it out then I used the fence paint for the bottom of the deck. I made the railing by pulling up sections then connecting them by making more squares on the side of the posts and pulling them out. I made the stairs by creating the lines of the stairs on the wall of the house and then pulling them outwards.